Column
MOUS Matters
Merging into the Fast Lane
Gini and Annette walk you through the mail merge skills you'll need to pass the Word 2000 and 97 expert exams.
by Gini Courter and Annette Marquis
2/4/2002 -- If you are an infrequent merger -- one of the people who uses mail merge once a year to send out holiday cards and then forgets about it the rest of the time -- preparing for Word's Expert exam may feel a lot like merging into LA's Interstate 405 at rush hour. All you can do is close your eyes, grip the wheel tightly, and hope for the best. However, with just a little practice, even infrequent mergers can be merging with the best of them. Mail merge is a powerful tool and, like other high-level application features, you won't tap into all the power with infrequent use. In this article, we'll focus on one of the less used but most useful mail merge features: using Word 97 or 2000 to merge with Outlook Contact data. It helps to have a little mail merge experience under your belt before attempting this, but if you're a merge novice, fasten your seatbelt and come along from the ride. Within no time at all, you'll be able to generate labels, letters and other documents from your most powerful source of contact information: the contact data you use every day in Outlook.
Note: Because the mail merge features in Word 2002 have been completely revamped, we'll save discussion of those for a future column.
The Word 97 Expert Exam Objectives make two references to the mail merge features:
Generate a Mail Merge
- Merge a document using variable data
Use Sort
- Sort records to be merged
The Word 2000 Expert Exam details these expectations a little bit further:
Using Mail Merge
- Create main document
- Create data source
- Sort records to be merged
- Merge main document and data source
- Generate labels
- Merge a document using alternate data sources
Merge uses a Word document (the "main document") and a data source (records stored in a Word table, a database, an address book, or another valid data file) to create individualized documents. To pass the exam, you have to be able to create a Word data source, create a main document, sort the records, and merge the two. In addition, you must be able to use data that is stored in alternate data sources such as Excel and Outlook (Word 97's reference to "variable data"). Yes, Outlook! Surprised that you can merge Outlook data with Word? Although you can create a data source right in Word, we don't recommend it. Word isn't a database (like Access or Excel) or a contact management system (like Outlook), so there's no compelling reason to store data in Word. If you're tracking information about people, then an Outlook Contacts folder is the best place to keep it. Outlook is more than just an e-mail program: you can use it to track e-mail addresses, names, street addresses, phone numbers, and a whole host of other information. Enter it in Outlook and use it for email, phone calls, personal letters and of course, mail merge.
Note: If you're not familiar with Outlook's Contacts folder, launch Outlook, click Contacts in the vertical Outlook Bar on the left side of the window, then click the New button to create a new contact.
Invoking the Mail Merge Helper
The Mail Merge Helper is the best starting place for all merges whether or not you have an existing data source. Open Word and choose Tools , Mail Merge to launch the Helper. Begin by clicking the Create button under Main Document (see Figure) and selecting the type of merged documents you want to create with your data source. You can use the Outlook Contacts folder in multiple merges with different document types. For the sake of this article, let's say you are writing a letter to a group of customers to introduce yourself as their new Customer Service Representative: in other words, a form letter. .
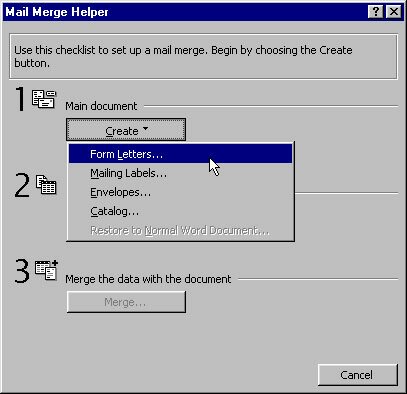
After you select Form Letters as the document type, Word asks if you want to use the active (open) document or a new document for your main document. Don't let this confusing Word message slow you down.

Choose Active Window if the open document is blank or if you've opened an existing document that you want to modify for use in this merge. If you have any other document open, choose New Main Document.
Connecting to the Outlook Address Book
Click the Get Data button on the Mail Merge Helper, then choose Use Address Book. Select Outlook Address Book from the list.
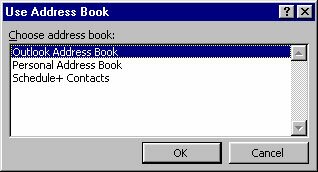
After you do, you are greeted with the Word message that wins the second prize in the "Most Useless Message Box" contest (first prize was awarded to the error message that reads "There is no message for this error" No joke.):

Given that you have no other choice and it's the right thing to do anyway, click the Edit Main Document button so you can finish setting up your form letters. This places you in the Word document that you chose for your main document. If you selected a New document, the only visible difference between this blank document and a typical blank Word document is that the Mail Merge toolbar is turned on.

You use the Mail Merge toolbar to set up your form letters, preview your results and complete the merge.
Note: To access additional Outlook Contact folders, see "Accessing Additional Contacts Folders" later in this article.
Inserting Merge Fields into a Form Letter
To add field codes to a form letter, click the Insert Merge Field button on the Mail Merge toolbar to access the Outlook Contacts fields. Only about half of Outlook's Contacts fields are available from this list because not all fields can be converted to the Outlook Address Book format. This means you may not find all of the fields you want to use (see the note below for a suggestion as to how to get around this problem). However, commonly used fields are available for you to use. Be careful to choose the specific fields you want to use. If you are writing a letter, you'll want at least the following:
- First_Name
- Last_Name
- Postal_Address
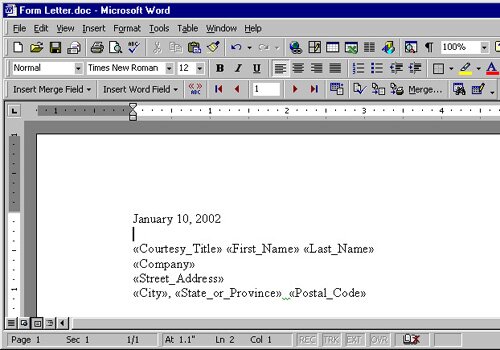
Postal_Address includes the street address, city, state and postal code in the address you've marked as the Mailing Address in each Outlook contact. If you want to use a specific address (for example, home addresses even if the mailing address is the contact's business address), scroll down the list and choose either Street_Address (representing the street address marked as the mailing address), Home_Street_Address or Other_Street_Address and the corresponding city, state and postal code fields.
Be sure to insert spaces and press Enter where you want spaces and new lines of text to appear in each merged document. The example below shows the beginning of a form letter using the street address fields:
Note: If you really need to use Contact fields in your merge that are not available from the Outlook Address Book, define an Outlook table view that contains all of the fields you want and use Outlook's Import and Export feature to export the data to a comma delimited text file. You can then use the comma delimited file, rather than the Outlook address book, as your data source. It takes a few extra steps, but it works.
Saving the Merge Main Document
It's a good idea to save the form letter main document you are creating. We recommend that you give the main document file a name that clearly identifies it as a form letter (main document) and the data source it uses. For example, in this case you might want to name it Introduction Form Letter to Outlook Contacts. That makes it clear that it's a mail merge letter that uses Outlook Contacts as its data source. You can reuse the saved main document in future merges -- for example, when you want to introduce yourself to a new group of customers.
Creating the Body of the Letter
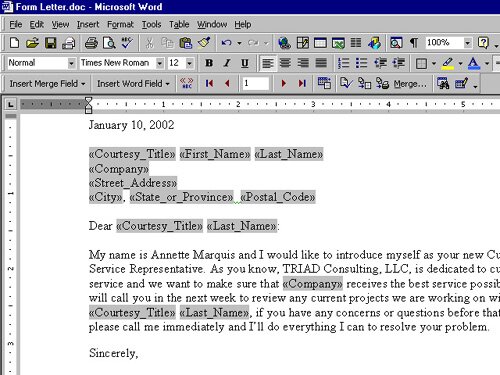
You are now ready to write the body of your letter. Remember, you can insert fields at any point in the body of your text to make your letter sound even more personal. In the example below, the field codes are shaded so you can easily distinguish them from the non-variable text.
After you've entered all the field codes and other body text for your letter, save the form letter again prior to completing the merge.
Previewing Merged Data
 Before you complete the merge, you may want to preview the merged data to make sure you selected the correct fields and everything (including spacing around merge data) is positioned correctly. Click the Preview Merged Data button on the Mail Merge toolbar to see a display of the first record. Click the navigation buttons on the Mail Merge toolbar to move back and forth between records. Before you complete the merge, you may want to preview the merged data to make sure you selected the correct fields and everything (including spacing around merge data) is positioned correctly. Click the Preview Merged Data button on the Mail Merge toolbar to see a display of the first record. Click the navigation buttons on the Mail Merge toolbar to move back and forth between records.

Although you can leave the Preview Merged Data button on and still make changes to your form letter, we recommend clicking it again to turn it off to avoid confusing the form letter for the final merged document.
Sorting and Filtering Records
If you want to include only some of the records in the final merge, you can use Word's Query Options to enter filter criteria and then sort the records in the order you want them to appear. Order may not make a difference with form letters but it comes in real handy when you are creating labels and need them in alphabetical or postal code order. Access Query Options by reopening the Mail Merge Helper click the Mail Merge Helper button on the Mail Merge toolbar or clicking the Merge button on the Mail Merge toolbar. In either case, click the Query Options buttons to open the Query Options dialog box shown here.
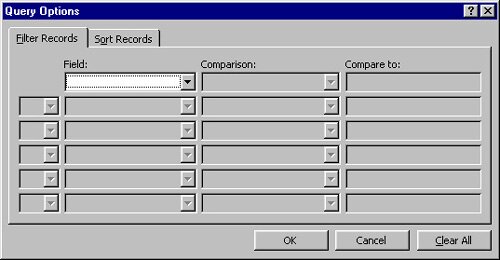
To create a filter, follow these steps:
1. Select a field you want to use in a filter, such as State_or_Province.
2. Select the Comparison operator you want to use.
3. Enter the data you want to compare.
4. Select And or Or to add a second criteria. Hint: Select And if you want each record to meet both criteria and Or if you want each record to meet either criteria.
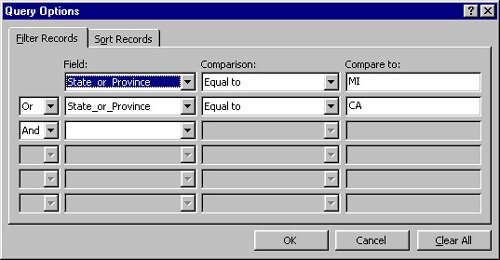
For example, if you want to select records from Michigan and California, you would make the choices shown here.
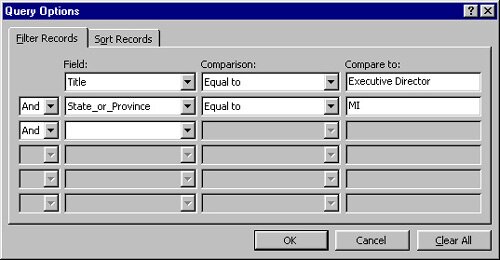
Here's another example: if you would like to select only the people with the title of Executive Directorwho are from Michigan, you would make the choices shown here.
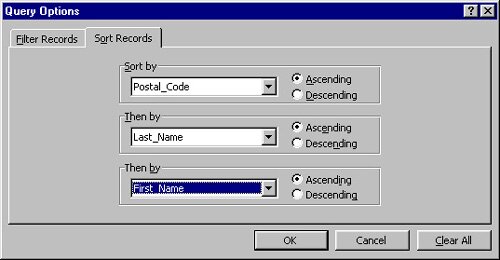
When you have entered all the filter criteria you want to include, click the Sort Records tab of the Query Options dialog box to select the sort order. In the example below, the merge results will be sorted by Postal_Code, Last_Name and then by First_Name.
If you make a mistake or change your mind in the Query Options dialog box, click the Clear All button. It only clears the choices on the open tab so if you really want to clear all the query options, open each tab and click the Clear All button. To accept the query options you set, click OK.
Note: If you want to select individual records to include in a merge or if you want to filter by a field not available in Word, create a new Contacts folder in Outlook (Select Contacts and choose File , New , Folder) and drag the contacts you want into the new folder. To filter by Category, define or select a Category view and drag the results into the new folder. See "Accessing Additional Contacts Folders" later in this article for information about how to select the new folder as the data source.
Completing the Merge
You've selected the data, written your letter, and set the filter and sort options. (If you're going to use the same filter and sort options in future merges, save the file again to save the options.) Now you are ready to complete the merge. Click the Merge button on the Mail Merge toolbar or on the Mail Merge Helper to open the Merge dialog box.
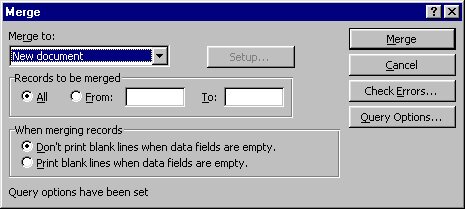
To create a new document that contains the merged letters, click Merge again. Word creates a new document with each letter appearing on a new page. Before you send the letters to the printer, you may want to personalize letters even further by editing the letters to specific people. For example, you can add a personalized post-script to the customers you've met recently. After you've printed the letters, you can save the merged document if you want but in most cases, you'll close it without saving.
Merging Directly to a Printer
If you want to merge directly to the printer (not recommended if you are risk-adverse), choose Printer from the Merge To drop-down list. As soon as you click Merge, your letters are on their way to the printer of your choice.
Merging to Electronic Mail
If you would rather create e-mail messages, choose Electronic Mail from the Merge To drop-down list. Click the Setup button to identify the field that contains the Mail/Fax address you want to use, the subject line of the e-mail message and whether you want to send the letter as an attachment to the message or as the body of the message.
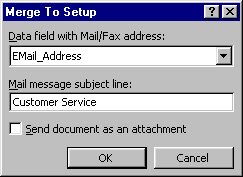
When you click Merge, Word creates e-mail messages and sends them to your Outlook Outbox. If you have a network connection, they will move on through to your mail server. If you are off-line or use dial-up, they will sit in your Outbox until the next time you connect and send mail.
Accessing Additional Contacts Folders
You are not restricted to using Outlook's main Contacts folder as your only Outlook source for contact data. If you have additional Contacts folders that are set up as Outlook address books, Word prompts you to choose which address book holds the contacts you want for the merge. If you are on a Microsoft Exchange Server, you can use a public Contacts folder in a Word merge. The trick to making any Contacts folder available to Word for merging is to first make the folder an Outlook address book. This is a property setting that you can access from the folder's Properties dialog box. Right click the folder on the Outlook bar or in the Outlook folder list and choose Properties. In the Properties dialog box, select the Outlook Address Book tab and enable the Show This Folder As An E-mail Address Book checkbox.
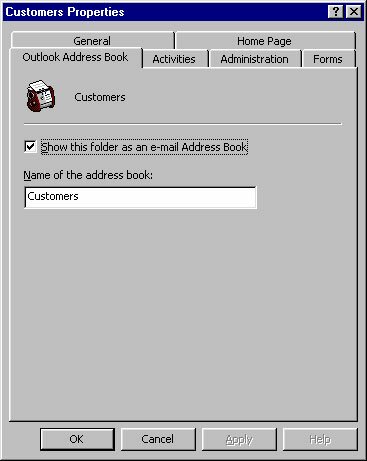
After you designated additional Contacts folders as Outlook address books, return to the form letter and select a different address book as the data source. To do this, follow these steps:
1. Reopen the Mail Merge Helper (Tools, Mail Merge)
2. Choose Get Data.
3. Select Use Address Book, choose Outlook Address Book and click OK.
4. Select the Address Book you want to use from the Mail Merge From Contacts Folder dialog box and click OK.
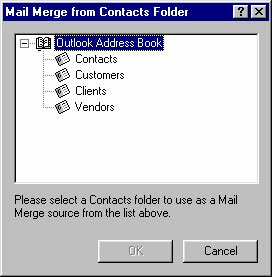
Note: If you are using Outlook 97, it helps to close and reopen Outlook and Word after you've established new address books to make sure that Word recognizes them. However, this step creates an additional problem. Word cannot retain its link to an Outlook 97 address book after you close the form letter document. When you reopen the form letter, you see a message similar to this one:

You can solve this problem by clicking Remove Data/Header Source and when the form letter opens, reconnect to the Outlook Address book just like you did the first time.
Finding Additional Mail Merge Help
If you are using Office 2000, you can download the Microsoft Word 2000 Mail Merge Help file directly from microsoft.com. This is an excellent resource for both beginners and advanced mail mergers. You can find out more about how to download this resource by reading this Microsoft Knowledge Base article: WD2000: Mail Merge Help File Available for Download (Q282307). 
Questions? Comments? Post your thoughts on this column below!
Gini Courter and Annette Marquis are co-owners of TRIAD Consulting, which specializes in collaboration solutions and training. Courter and Marquis are the authors of over 20 computer books including Mastering Office XP Premium Edition, Mastering Outlook 2002, and Mastering Excel 2002, all published by Sybex.
|


