|
7/24/2002 -- Point of view is often what distinguishes an optimist from a pessimist, a success from a failure, and a dreamer from a realist. It's all in how you look at it. You may be surprised to find out that Microsoft Outlook is no different. Outlook is a receptacle for some of your most important data. You can access this data in a number of different and useful ways but in order to tap into the real power of Outlook, you have to know how to change your point of view. Outlook views give you the power to extract the data fields you want to see, select records based on criteria you establish and organize the data in ways that make sense for you. Not only can that make data easier to find, it turns data into information -- information you can use to make decisions, share with your colleagues, and organize a project.
Outlook comes with a number of predefined views for each of its folders. The more convenient way to switch between views is to turn on the Advanced toolbar. Don't let the name scare you -- most of the tools on the Advanced toolbar make it easier to navigate Outlook and to work with views. To turn on the Advanced toolbar, choose View, Toolbar, Advanced. Click the down arrow on the Current View button to see a list of predefined views for the folder you are in.
Outlook has five basic types of views. Each of the available views is a variation of one of these:
Table view: The default view in Tasks, this shows data in columns and rows. Messages is a typical table view in the Inbox.
Timeline view: Used in Journal to see when activities occurred, this displays data across a timeline. The default view in Journal, Entry view, shows activities on a timeline grouped by entry type.
Card view: This displays Contact data in an address-card format. Address Card view in Contacts is the most common use of a card view.]
Day/Week/Month view: Used with Calendar, this shows a Date Navigator and Day, Work Week, Week and Month buttons to display data.
Icon view: The default view in Notes, this displays a small or large icon for each Outlook item.
If you want to create a new view, you have three options. You can:
- Modify an existing view.
- Copy an existing view and modify the copy, leaving the original unchanged.
- Create a new view from scratch.
To modify an existing view, follow these steps:
1. Switch to the view you want to modify.
2. Click View, Current View, Customize Current View to open the View Summary dialog box.
3. Click the Fields button to add or remove fields from the view. In the Show Fields dialog box, select the fields from the Available Fields column you want to add to the view and click Add. To remove fields, select the fields from the Show These Fields In This Order column and click Remove. If the field you want is not available, click the Select Available Fields From drop-down list and select a different category of available fields. When you finished adding the fields you want, you can change the order in which the fields appear, by clicking the Move Up and Move Down buttons. Click OK, when you have finished choosing fields.
4. If you want to change the grouping of the data, click the Group By button. Grouping allows you to display Outlook items together based on common data, e.g. a category, a date, a company. Select the first field you want to group by from the Group Items By drop-down list. Chose if you want to show the field in the view or only at the top of the group and if you want the data presented in ascending or descending order. Select Additional Group By fields from Then By drop-down lists. You can choose up to four group by fields. You can also set whether you want the groups to appear collapsed or expanded when you switch to the view. If the field you want to group by doesn't appear in the list of Group By items, switch to a different set of fields from the Select Available Fields From dialog box. You can choose All Expanded, All Collapse or As Last Viewed from the Expand/Collapse Defaults drop-down list. When you have made all the Group By choices, click OK.
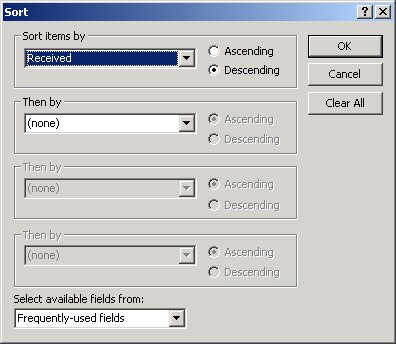
5. Click the Sort button to set the fields you want to sort by. You can choose up to four sorting levels and have them appear in ascending or descending order. If the field you want to sort by doesn't appear in the list of Sort By items, switch to a different set of fields from the Select Available Fields From dialog box. When you have set the Sort order, click OK.
6. Define criteria for records to display by clicking the Filter button. For more about how to create a filter, See "Filtering Data" later in this article.
7. Change display settings and fonts under the Other Settings button. For more about setting formatting options, See Formatting Views later in this article.
8. Click the Automatic Formatting button to apply special formatting rules to items, such as applying bold to unread items in the Inbox. For more about setting automatic formatting options, See Setting Automatic Formatting Options later in this article.
9. When you are finished setting all the options, click OK to apply the customized view.
Making a copy of an existing view or creating a new view from scratch is essentially the same as modifying an existing view, but there are a couple of extra steps involved. To copy an existing view or create a new view, follow these steps:
1. Switch to the module for which you want the new view.
2. Click View, Current View, Define Views to open the Define Views For dialog box.
3. To copy an existing view for modification, select the view from the list, click Copy, and enter a name for the new view. To create an entirely new view, click New, enter a name for the view, and select the type of view. With either option, if you are on an Exchange Server network, indicate if you want this view visible to everyone in this folder, visible only to you in this folder, or available in all Contacts folders.
4. Click OK and follow steps 38 in the procedure outlined above for modifying an existing view.
5. Click Apply View to make the new view the current view for this folder or OK to add the view to the list of available views but not apply it.
Creating a Filter
To place limits on the items displayed, create a filter based on one or more criteria. With a filter, only the items that meet the specified criteria are displayed. Examples of filters in the predesigned views include the following:
- Unread Messages (Mail) filters messages based on read status.
- Incomplete and Next 7 Days (Tasks) filters tasks based on completion status and date.
- Phone Calls (Journal) filters items based on type.
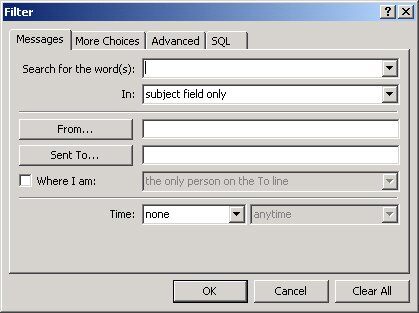
To create a filter in the View Summary, click the Filter button to open the Filter dialog box. The dialog box that appears is based on the type of folder your view is in. This dialog box begins with a Contacts tab because the view is a Contacts view.
In a Mail view, the first tab of the dialog box is the Messages page.
In the first page of the dialog box, you can enter criteria to filter items based on values that you entered or that Outlook automatically added to fields in the item. The following table summarizes the available filter criteria in each folder.
|
Filter Criteria by Item Type
|
| Criterion |
Item Type |
Used to Filter |
| Search for the Words |
All |
Text in fields and logical field groupings: name fields, address fields, subject field, and message body |
| E-mail |
Contacts |
Contacts with the selected e-mail addresses |
| Entry Type |
Journal |
Entry type: phone call, e-mail message, etc. |
| Contact |
Journal |
Contact related to the journal entry |
| Status |
Tasks |
Based on completion status |
| From/To |
Tasks |
Tasks received from or delegated to specified people |
| Time |
Contacts and Notes |
Contacts created or modified in a selected time frame (today, last seven days, etc.) |
| Time |
Journal |
Journal entries created, modified, starting, or ending in a selected time frame |
| Time |
Mail |
Messages created, modified, received, sent, due, or expiring in a selected time frame |
| Time |
Tasks |
Tasks created, modified, due, starting, or completed in selected time frame |
To begin creating a filter, enter text in text boxes and select items from the drop-down lists. When you create a filter, the items displayed in the view must meet all the criteria you enter. For example, the filter shown here for Journal will display only phone calls made in the last seven days. E-mail messages sent in the last week and phone calls made eight days ago will not be displayed in the view.
- On the More Choices tab of the Filter dialog box you can specify criteria for these options:
- Categories: must include all the categories you select (if more than one)
- Only items that are: read or unread
- Only items with: attachments or no attachments
- Whose importance is: normal, low, high
- Size (in kilobytes): is greater than, less than, approximately equal to, or between
If you entered text in the Search for the Word(s) text box on the first page of the dialog box, check the Match Case check box to make the filter case-sensitive. When a criterion isn't relevant in the current folder, the choice is disabled. For example, you can't filter Journal entries on Importance, because there's no way to set importance for a Journal entry.
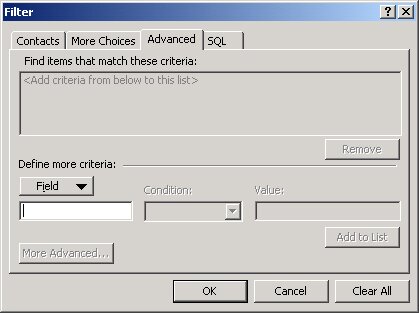
Use the Advanced tab of the dialog box to create field-specific criteria. For example, let's say you'd like to create a filter that shows contacts with a business or home address in Chicago. The first tab lets you look for text in all the address fields, so a filter for Chicago will return contacts in the city of Chicago, but will also display contacts on Chicago Boulevard in Detroit, which is a long way from Wrigley Field. In the Advanced tab, you can filter based on a text string in a specific field, so you can filter contacts where the Chicago that turns up is in the Business Address City field or the Home Address City field.
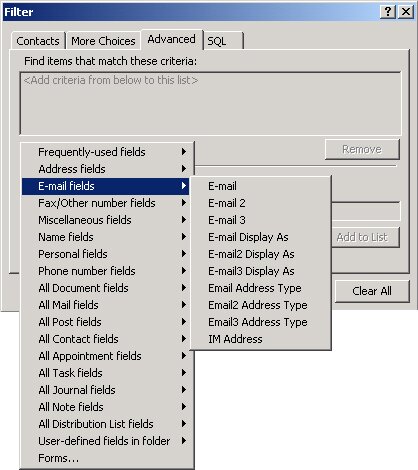
You create an advanced filter by building criteria one at a time and adding them to the Find Items That Match These Criteria list. To create a criterion, click the Field button to open the menu of field lists. Move the mouse pointer to the list that contains the field you want to create a criterion for, and Outlook opens the field list so you can select the field.
In the Condition drop-down list, select a condition, and then enter the text string for the condition in the Value text box. For Example, if you choose City as the field you want to filter on, you could choose Contains as the Condition and type Chicago in the Value text box.
When all the required parts of the condition are in place, Outlook enables the Add to List button. Click the button to move the condition to the Condition list. Create additional conditions until you've created all the conditions for your filter.
Entering Conditions Using SQL
If you know how to write SQL (Structured Query Language) statements, you can enter and edit them directly on the SQL tab.
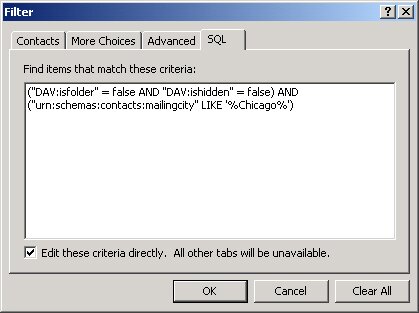
Select the Edit These Criteria Directly checkbox to modify the existing criteria and add additional statements. When you've finished working with SQL, clear the checkbox again before switching to another tab.
Removing a Condition
To remove a condition from the Advanced tab, select the condition and click the Remove button. This doesn't affect the conditions on the other two tabs of the Filter dialog box. To remove all the conditions from the filter and start again, click the Clear All button at the bottom of the Filter dialog box.
Reviewing Filters
When you return to the View Summary, don't be concerned if the summary doesn't reflect all the filter criteria you entered. It displays only one criterion unless there is no filter applied to the view, in which case it displays "Off." To see all the filter criteria in any view, open the Filter dialog box.
When a view is filtered, Filter Applied appears in parentheses in the Folder banner. You can't change a filter directly in the view. You must open the Filter dialog box (View, Current View, Customize Current View, Filter).
Formatting a View
To change fonts or gridline colors, click the Other Settings button in the View Summary (View, Current View, Customize Current View) box. The following description is of the Other Settings dialog box for the Inbox which lets you set font and gridline attributes for the Messages view of the Inbox; the dialog boxes for the other folders and views have similar settings and options.
Two or three default fonts are used in a view:
- Font for column headings
- Default row font, used for items displayed in the view
- AutoPreview font, for items such as messages
To change one of the fonts, click the Font button to open the Font dialog box. Select a font, and then click OK to close the Font dialog box and return to the Other Settings dialog box.
Setting Column Attributes
To have all columns automatically sized to fit their contents, enable the Automatic Column Sizing check box in the Column Headings section.
Setting Row Attributes
The two row attributes are generally used to create views in custom applications. When you create an application in Outlook, you can secure the application by protecting the application's forms -- opening only forms when a user has the correct password. However, this doesn't do a lot of good when users can edit items or create new items in the views. To create a "read only" view, disable the Allow In-Cell Editing check box. Users will be able to look at items in the view but won't be able to change the existing items. To prevent users from creating new items in a View list, turn off the Show "New Item" Row check box.
Setting AutoPreview Attributes
AutoPreview is used in Mail, Tasks, and Journal folders to show the first few lines from the open notes or message area of an item. You can enable AutoPreview for all items, unread items, or no items. Choosing either Preview All Items or No AutoPreview, then clicking the AutoPreview button in the Advanced toolbar, toggles the preview for all items off and on. However, when you choose Preview Unread Items, clicking the AutoPreview button in the view displays and hides the AutoPreview for unread items only, so choosing Preview Unread Items effectively turns AutoPreview off for read items in the view.
Setting Gridline Attributes
Gridlines have two attributes: line style and color. The settings appear both on the screen and when you print the view in a table style. Choose both settings from the drop-down lists. The shading color for group headings is automatically inherited from the Windows system settings. You can turn shading on or off by selecting or clearing the Shade Group Headings check box. You can change the default gridline color by selecting another one from the Color list.
Setting Preview Attributes
While you can include a Preview Pane in any view, most folders have nothing to preview. In Contacts, for example, the Preview Pane will open below the list, but will be empty. If you display the Preview Pane, you can display or hide the header information for the item displayed in the view.
When you've finished with the Other Settings dialog box, click OK to close the dialog box and return to the View Summary.
Setting Automatic Formatting Options
Outlook has Automatic Formatting rules that work in all the folders, so when you're creating a view, the rules are on by default. For example, overdue items are red in every folder, and unread items are bold. When you create a view, you can create new rules for the view and modify or disable the default rules. In the View Summary dialog box, click the Automatic Formatting button to open the Automatic Formatting dialog box. The default rules are listed in the dialog box.
You can't delete the default Automatic Formatting rules, but you can turn them off for this view by disabling the rule's check box. Let's say you're creating a view called Overdue Items, which is filtered to display only overdue items. You might want to turn off the Automatic Formatting for Overdue Items, because it won't help distinguish items in the list.
However, you might also leave the formatting on. The Outlook interface consistently provides the same formatting so that users have visual cues to let them know when items are overdue or unread.
If you look at the Overdue Items view in Tasks, you'll notice that all the items have red text. You don't have to look at the name of the view to know what you're looking at. Consistency in the Windows environment has proven to be a powerful tool that flattens the learning curve.
To create a new formatting rule for this view, click the Add button. A new rule named Untitled is created. Enter a new name for the rule, and then click the Condition button to open the Filter dialog box. Enter the conditions for the rule, close the dialog box, and open the Font dialog box to select formatting for items that meet the conditions of the rule.
Restoring and Cleaning Up Views
Experimenting with new views can turn Outlook into a real powerhouse. However, you may decide that you have experimented too much and want to restore things to their original state. Don't fret, you can easily reset predefined views and delete custom views so you have nothing to worry about.
If you modify one of the predefined views and later decide to return it to its original state, open the Define Views dialog box (View, Current View, Define Views), select the view and click Reset.
To delete a custom view, switch to the module that contains the view you want to delete. Choose View, Current View, Define Views, select the view you want to delete, and click the Delete button. 
|

 Column Story
